Step 1: How to add an email account
1. Go to the Android email app (On your phone)
- Then, click Other

2. Input the email account and linked password that you will add
- Then click Enter

3. On the screen, you will be asked to choose between two protocols:
- POP configuration: allows you to download copies of email messages to a local computer
- IMAP configuration: allows you to read emails as they appear on the hosting server

Step 2: How to set up in POP or IMAP
POP configuration
1. At the top of the screen, under Server Settings, make the following settings:
- Email address: enter the email account you will add
- User: re-enter the full email account
- Password: enter the password linked to the email

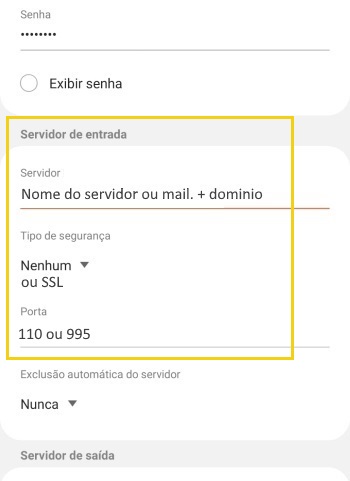
2. In POP, in the Incoming Server section, make the following settings:
- Server: insert the name of the hosting server “mail. + the domain name (ex: mail.seudominio.com.br)”
- Security Type: select SSL (For connections with SSL)
- Port: insert 995 (Connection with SSL)

3. In the Outgoing Server section, make the following settings:
-
-
- Server: use the same name you entered in the Incoming Server section
- Security Type:Select SSL (For connections with SSL)
- Port:insert 465 (Connection with SSL)
-

4. To finish, enter the complete account email and password
-
-
- Then, click Enter
-

When finished, the email should be set up 🙂
IMAP configuration
1. At the top of the screen, under Server Settings, make the following settings:
-
-
- Email address: enter the email account you will add
- User: re-enter the full email account
- Password: enter the password linked to the email
-

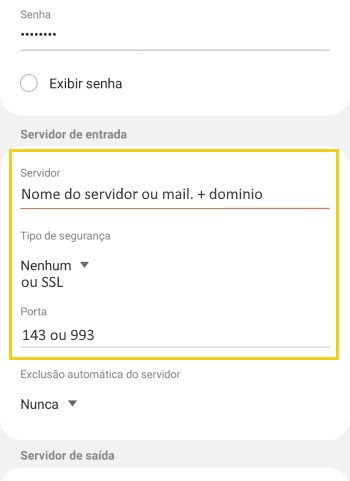
2.In IMAP, in the Incoming Server section, make the following settings:
-
-
- Server: insert the name of the hosting server “mail. + the domain name (ex: mail.seudominio.com.br)”
- Security Type: Select SSL (For connections with SSL)
- Port: insert 993 (Connection with SSL)
-

3. In the Output Server section, perform the
